
No matter what species you like to catch, it’s best to keep it wet and in a net. Here’s how you can build your own. While it’s not a quick and easy build, even if you half-ass it, you should have a strong net that’s also a conversation piece.
Required tools:
- Jigsaw/bandsaw
- Sandpaper and belt sander (oscillating spindle sander is helpful)
- Drill
- Table saw
- Router table
- C-clamps
- Chisel
- Thickness planer
Step one: find a net basket
Get a net basket before you start. You can buy at these websites or find any net you like and base your design around it:
www.luckystrikebaitworks.com
www.cumingsnets.com
www.jannsnetcraft.com
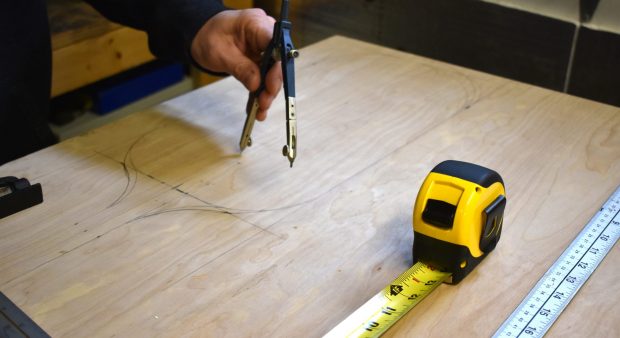
Step two: make the mould

- Trace the hoop of your net onto one-inch plywood.
- Cut the shape out (this will be the hole of your net) with a jigsaw and/or bandsaw and drill 11 ⁄8″ holes as shown (for clamping later).
- Screw the finished mould to another piece of plywood, as a mould base.
Step three: make a handle
- Find a nice piece of hardwood and plane or sand it to 7/8” thickness. Trace a net handle as shown. The handle should fit your net mold perfectly. This handle is about 1.5 inches wide at the end.
- Cut the handle using a band saw and sand smooth with a belt and oscillating spindle sander.

Step four: cut clamping blocks
Cut clamping blocks from your original piece of plywood to fit the outside of your net mould. I use nine segments, as shown. Ensure a smooth, well-sanded finish on both the mould and the clamping blocks.

Step five: seal the mould to prevent sticking
Apply a coat of varnish and some wax to the mould (not the handle or clamping blocks) to prevent the glue from sticking in the next steps.
Step six: cut strips of wood for your laminated hoop
- 1 ⁄8′′ thin x 7 ⁄8′′ wide strips of hardwood (I used cherry for this project) will be layered to make the net hoop. Here’s how I make these strips:
- I start with 5 ⁄4′′ rough lumber and plane both sides smooth to get it to 7 ⁄8′′ thickness. For this specific net, I use boards that are at least 5 feet long so the strips can wrap all the way around the mould.
- Rip approximately 1 ⁄4′′ strips using the table saw. Send the strips back through the planer to create two smooth sides and an overall 1 ⁄8′′ thick strip. Five strips are required, making a net hoop thickness of 5 ⁄8′′ overall.

Step seven: soak and clamp the strips
- With a pencil, mark the centre of each strip and number them one through five. Place the strips in a sealed PVC tube and fill it with boiling hot water.
- Remove the strips from the tube after 30 minutes. Align the centre of all five strips to the top centre point of the mould and begin clamping the strips between the mould and clamping blocks, as shown.
- Ensure the handle is in place. The strips will clamp around it.
- Let it all sit for at least 24 hours at room temperature.

Step eight: this time with glue
- Unclamp the strips, gently take them apart and let dry another 24 hours at room temperature.Prepare a container of wood glue and use a 1″ brush to apply it to all the strips. Glue them together in the same order in which they were clamped.
- Apply glue to the handle where it will contact the strips.
- Reclamp the strips as in step 6.
Step nine: unmould, chisel, and sand
- Use a flat chisel to carefully remove the net from the mould. The net will be very tight and may stick to the mould in spots.
- Trim the strips where they extend past the handle.
- Carefully chisel away hardened glue and if the five strips aren’t flush, trim them up a little with the chisel prior to sanding, starting with 80 grit and finishing with 220 grit sandpaper. An oscillating spindle sander is great for delicately sanding inside curves.

Step 10: router work
- Next, create a jig to groove a slot along the outside of the net hoop for the lashing string.
- Use a 3 ⁄32′′ grooving bit and set the jig on top of the bit so that it allows the groove to be 1 ⁄8′′ deep. Set the router to precisely cut at the middle of the net.
- Mark the net to show you where to start and stop the groove. It should stop just above the handle.
Optional: To round off your net’s edges, use a 1 ⁄4 round-over bit and go around the entire perimeter of the net hoop and handle.
Step 11: drill holes
Have your net handy before drilling. Your hole count will need to match it. Using a 1 ⁄16′′ bit, drill evenly-spaced holes inside the groove. These holes will receive the lashing string.

Step 12: apply a finish
Many options exist, but I prefer Tung oil. Apply several coats using a finishing cloth. The more coats you use, the longer the finish will last.
Step 13: lashing the basket
- Use tape or zip ties to fasten the net basket to the hoop so that it is spread out evenly.
- Thread a long piece of 1 ⁄6′′ lashing cord through a needle.
- Tie a knot at the cord’s end that’s large enough to fit the groove, but will not slip through the drilled hole.
- Starting at a hole nearest the handle, weave the lashing thread in and out of the net and drilled holes. Ensure the cord sits in the groove.

Originally published in the Jan.-Feb. 2021 issue of Ontario OUT of DOORS magazine.
Leave A Comment