
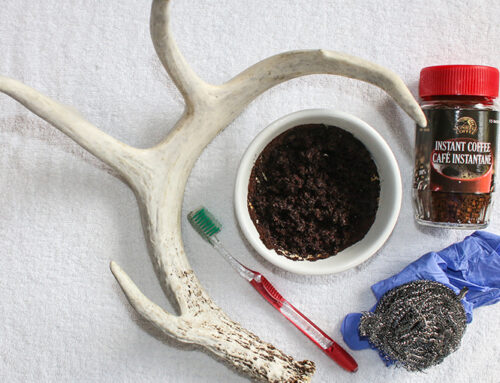
A European mount is a unique way to present a trophy harvest. Creating a professional-looking mount can be done at home in a couple of days with some common tools and ingredients.
1. Preparing the skull
Fresh or frozen skulls with skin and flesh left on them make the best European mounts, as the bone remains more porous, which is easier for cleaning and bleaching. Another method of de-fleshing skulls is maceration (soaking it in water for several weeks). It’s a good technique, but may require a bit more elbow grease to get the skull cleaned and de-stained.
Skulls that have been left to dry with hair or flesh on them may require even more effort because they will also need a re-hydration step before simmering, either by soaking for a few days in clean water, or using a chemical softener.
Make sure you have the right size pot to fit the skull and any antlers for proper processing. The pot needs to be large enough to cover the entire skull up to the antler attachment.
 2. Simmer
Set up your pot and propane burner outside. Place the skull in the pot and cover the entire head with cold water.
To protect the attachment and look of the antlers, I wrap the bases with aluminum foil.
Bring the water to a boil, then reduce heat and simmer until flesh loosens from the bone for removal. It may take up to a day of slow, gentle simmering for the proper removal of the tissues without saturating and lifting the small bones too much. Timing will depend on the size of the head.
3. Trim, boil, repeat
Once the flesh has loosened, remove the pot from burner and drain contents, reserving the skull for flesh removal.
 When draining the water, use a fine mesh sieve to ensure any loosened teeth and small bones do not get thrown out with the waste water. Later on, these bits can be glued back on to the skull.
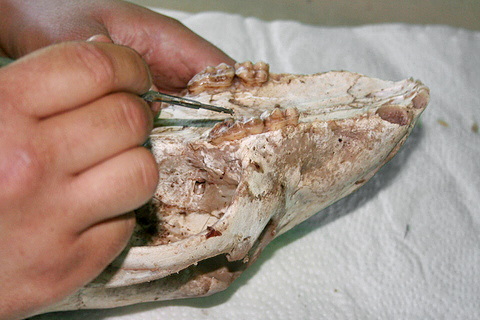
If the skull has simmered long enough, flesh should come off easily in large chunks when using your large knife.
Use a gentle downward scraping motion to remove the flesh. Digging too hard with the knife may dent the bone beneath. Once the larger chunks are lifted, use finer tools to remove the smaller, well-attached bits and debris that will likely be hidden in the many crevices of the skull.
I prefer to take the nasal bones off (these often fall off naturally during simmering), gut out the contents beneath, and glue them back on the skull during the finishing touch stage. Don’t forget to remove material from the brain cavity.
Once the loose flesh is removed, re-simmer in a pot of fresh water, and repeat trimming, using finer tools until all the flesh is removed. Continue to trim, boil, and repeat until the skull is clean.
4. Degrease and repeat
Once all the flesh and debris from the skull has been removed, rinse the skull and start to degrease it. Use warm soapy water and strong dish soap.
Degreasing will allow a more even bleaching and will prevent staining.
Discard soapy water and boil the skull for about 30 minutes in fresh water.
Return to the degreasing process. You may have to change your degreasing water several times throughout the skull cleaning process, depending on the size and condition of your skull.
Lightly degrease and scrub the antlers with light steel wool to loosen any ingrained dirt and debris, especially at the base. Don’t scrub too hard so to maintain the naturally stained character of the antlers, which will later be highlighted with wood stain.
5. Whitening and staining
When the skull is completely clean and dry, glue in missing teeth, nasal bone covers and any other loose bones. Wipe away excess glue to prevent yellowing or uneven whitening.
 To whiten the skull, apply an even, thick layer of high-test (30 or 40 volume) peroxide paste. Apply the paste with a foam brush and let stand for a few hours. Wear rubber gloves to protect your skin from bleaching.
Use a paste rather than a liquid because it is easier to apply and there is less waste.
Do not use chlorine bleach as it degrades the bone and can cause it to yellow.
For difficult skulls, rinse the peroxide paste off the skull with water, let it dry and reapply fresh peroxide paste.

Apply oil wood stain (I prefer warm, rich brown tints) to the antlers, let dry for 5 minutes, and then wipe off some areas with a soft, clean rag for a natural look. Try to blend the stain in.
Cover all whitened bone with paper towel to prevent the wood oil from staining where you don’t want it to.
In general, antlers are lighter towards the ends, so leave less stain towards the ends as well. Reference photos of live antlered animals help get an idea of natural antler colour.
6. Sealing stage
To seal in the finishes on your trophy, apply a light coat of non-yellowing matte or gloss clear varnish over the dry antlers, and optionally, on the dry whitened skull.
Let dry for a couple hours or until the skull and antlers are dry to the touch.
The next step is to find the perfect spot to hang and show off your new European mount.
Last year I used satin polyurethane aerosol and it yellowed after several months. Can you recommend a non-yellowing, matte varnish for this year’s European mount? Thanks in advance! This article really gave me the confidence to do my own trophy mounting this season!