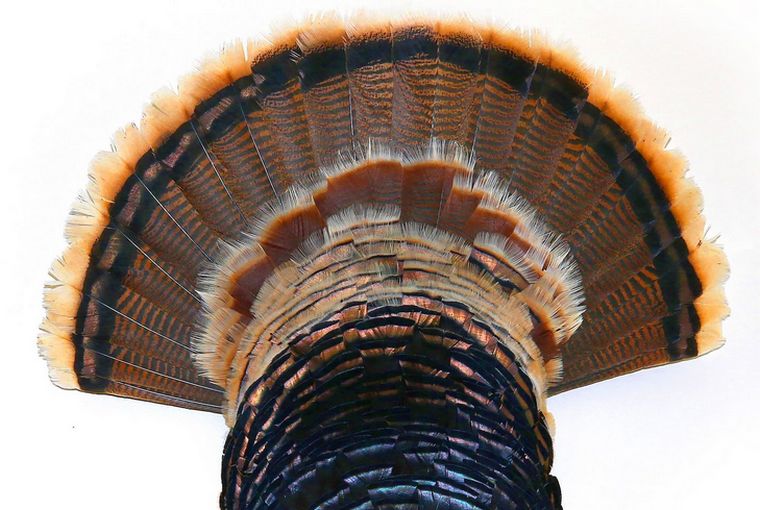
It’s not commonly seen in Ontario, but a turkey cape beautifully exhibits the bronze and black feathering that adorn a turkey’s back. It’s a pretty simple process and can be accomplished by any do-it-yourselfer in about an hour.
Part 1: Making the cuts
Step 1: Hang the turkey by its head (a tree or other stable structure will do). To keep them out of the way, tie the wings to each other around the back side of the tree.
Step 2: Using a very sharp blade or scalpel, make an incision at the back of the neck where the skin meets the feathers. Make skin-deep cuts angling down towards the tail as shown in the video. Err on the side of taking too much skin — you can trim later. The feathers you want to save will all face the same direction. Feathers from the far side of the neck and underbelly will point a different direction and can be plucked later.
NOTE: Unlike skinning a deer, do not pull the skin downward. Let the blade do the work. Pulling at the cape will easily tear the thin and tender skin, and that will be less repairable than a cut through the skin.
Step 3: Continue cutting down towards the tail. Get ahead of yourself on one side and then catch up on the other. This will help you see exactly what you are taking. When you get below the tail joint, cut inwards, meeting from both sides at the joint. When removing the tail fan, cut the flesh and tissue around the joint to free it. Grab the tail and simply spin it two to three times and it will come right off.
Part 2: Making the cape
Step 4: Drying and curing the cape begins with cleaning flesh and fat. Use your knife or a spoon to do this. Remove most of the flesh around the tail joint, and even on the underside of the joint before curing. Next, lay the cape flat and pour a healthy coat of Borax over the skin to dry it. Stick some Borax in the underside of the tail joint as well.
Step 5: Fan the tail out and pin the tail feathers in place with thumb tacks or nails (place the pins or nails just above the each feather’s shaft, keeping them in place rather than pinning them down). Let set for two to three weeks in a dry place. If at that time the skin is not entirely dry, add fresh Borax and let stand for another week or two.
Step 6: For mounting the cape to the wall, drill a small hole in the tailbone on the backside and run a piece of wire through it to hang. Or, find the centre of the tail and drive a nail through it, then hammer it right into the wall.
Originally published in the April 2020 issue of Ontario OUT of DOORS


Leave A Comment