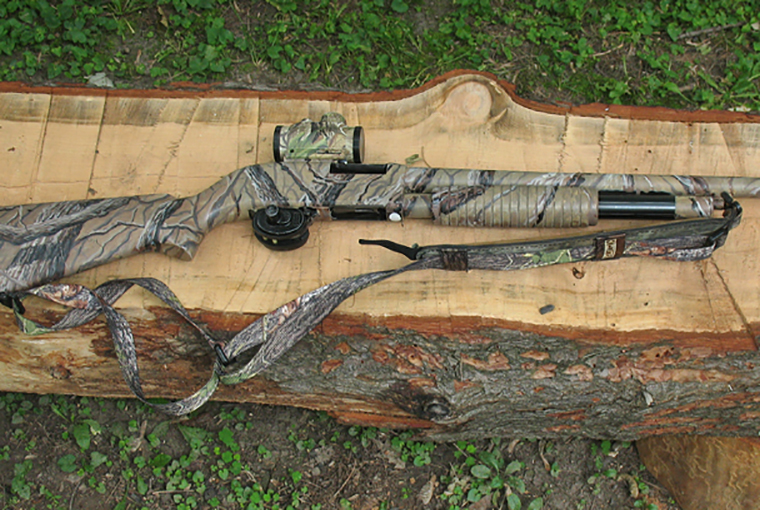
Most of us have an old gun locked away in our safes that holds a special place in our hearts. I do, a Stevens pump-action 12 gauge that was the first gun I ever owned. Truth is, despite my leaning towards European double guns in recent years, that tattered and scratched pump has seen its share of sunrises and has helped bring home countless game, from woodcock to whitetails. The very idea of selling it made little sense and would have generated probably even less money. So, I set out to overhaul it into a turkey gun that I affectionately call the Gobstopper.
Paint Prep
With the help of a knowledgeable friend, the first step was to completely dismantle the gun. Then, I soaked all internal and external mechanisms in methyl hydrate to strip off accumulated oil and grease that would prevent new paint from adhering to the gun. Once it was completely cleaned and dry, we reassembled it and began taping over all mechanisms and openings, including the slide bar, breach, trigger, and safety. I also taped the end of the muzzle to keep it free of paint or other debris as we worked towards a finished job.
Next, I took fine steel wool to the metal parts, including the receiver and barrel, to remove rust and old bluing, although a little bluing remained. I used steel wool on the stock, as well, but only after removing the old varnish with sandpaper.
Painting
Once the gun was stripped and wiped free of dust, I added my first coat of grey metal primer – a good quality aerosol. When this coat was dry and the entire gun was primed, I added a second coat of paint, a dead-grass colour in a matte finish. It would serve as my base coat to build all the camouflaged layers.
When it comes to making a believable camouflage pattern, I find that most people worry too much about duplicating commercial patterns. Remember, the point of camo is to break-up the shape or outline of the gun with varying tones and values of paint. Make sure your paints are matte finished, and don’t be afraid to mix colours and experiment. You can always try your hand at designs, patterns, and colours on a scrap piece of cardboard, if you wish. I attempted to create the look of branches and shadows, but you needn’t get this fancy. Simply crisscrossing your lines with different muted colours will work just as well.
Bells and Whistles
Once the gun was painted to my satisfaction, I removed all the tape from the trigger mechanism and muzzle and added a sight mount that would seat a red-dot-style scope. Then, I dismantled it again and oiled and lubed the gun, bringing it back into operational standards.
I walk a lot when I turkey hunt, so I purchased a well-padded camo gun sling and fitted it. Complete and comfortable to carry, I was off to the range to sight-in the gun.
The Finished Product
I’m happy with the results. The fact that I failed to bag a gobbler last year had more to do with too little time in the hardwoods than the look and accuracy of the gun. Ultimately, being able to breathe new life into a treasured firearm was rewarding. Now, looking to another season in the turkey woods, I have an affordable gun that’s accurate, comfortable to carry, and still holds all the memories and familiarity of an old friend.
Materials
- Methyl hydrate
- Sandpaper
- Steel wool
- Painters tape
- Small metal containers (fruit cups) for mixing paint
- Tremclad primer, grey
- H.S. Camo paint in black, white, mud brown, and marsh grass
- Paint brushes in size 12, 8, and 4
- Gun oil


Leave A Comment