Shooting well is all about repeatability. You must be able to do everything exactly the same on every shot in order to have consistent results on target. With that in mind, break your shot down into a series of repeatable steps and write each step down. At first you’ll consciously run through the list, but it will soon become second nature. I keep a small card in my target quiver with my sequence list and refer to it if my shots become inconsistent. It’s one way of resetting and calming down during a tournament or practice session.
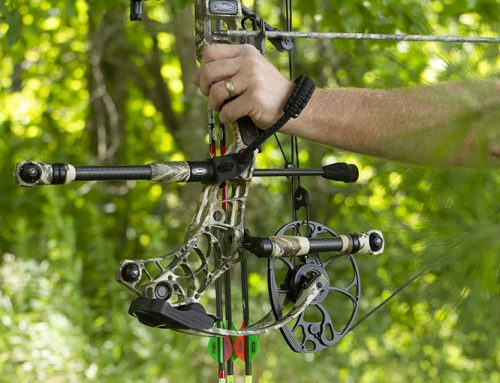
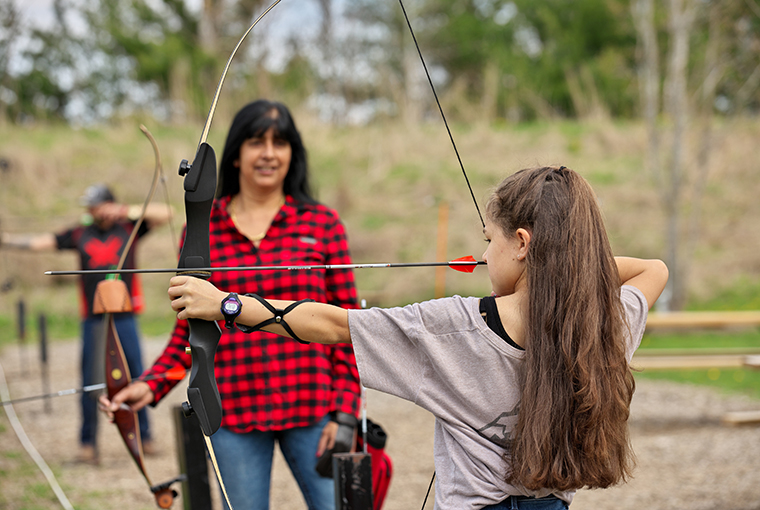
It’s natural to just grab a handful when gripping the bow, but there are good reasons to emulate the grip shown in the photo. Relax and let your arm and hand hang naturally by your side. Without moving your fingers at all, place your hand on the grip so that your index finger points straight down the front of the riser. That’s it. When you draw, all the draw weight of the bow will be on the heel of your hand, near the base of your thumb, and directly in line with the main bone in your forearm. At full draw, your knuckles should be in a line at approximately 45 degrees to the ground.
Click on image to enlarge.
By reducing the area of your hand that actually touches the bow, you also greatly reduce your own ability to torque the bow. In addition, you gain a ton of arm clearance for the string. Torquing the bow, and string slap against your arm/sleeve both contribute to big inconsistencies in your left-right groupings.
Shot Sequence
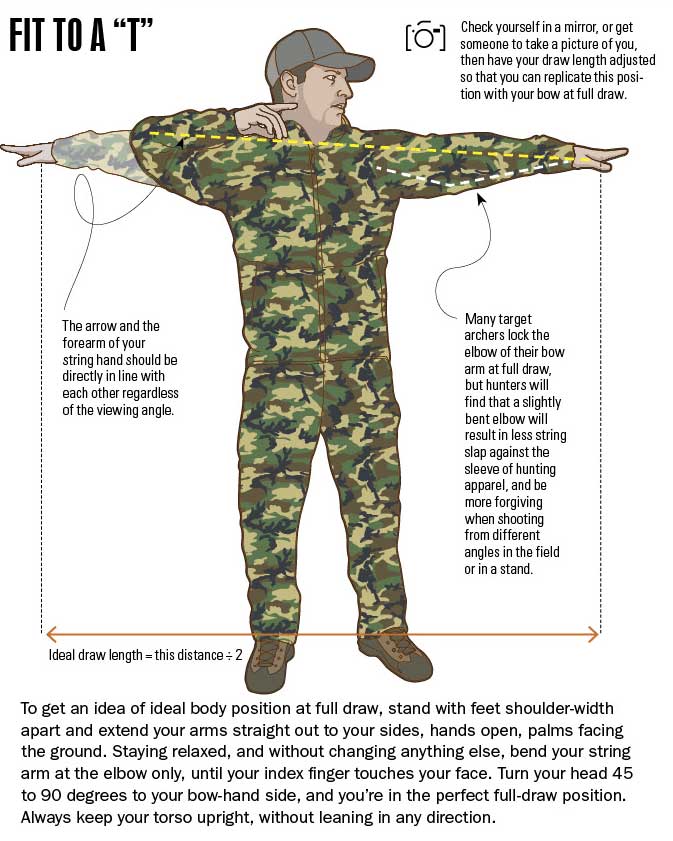
1. Stance: Position your feet shoulder width apart, pointed 90 degrees from your target. Some people are more comfortable with a slightly open, or closed stance. Open means you turn a couple of degrees towards the target, closed means you face slightly away. Open gives better arm and chest clearance for the bowstring.
2. Load the Arrow.
3. Set String Hand: Attach your release, or grip the string.
4. Set Bow Hand: You’ll shoot immeasurably better if you get as much of your hand off the grip as possible.
5. Sight Target: Lock your eyes onto the spot you intend to hit.
6. Draw: Raise the bow to shoulder height, then draw straight back with the arrow parallel to the ground at all times. If you’re unable to do this, you’re pulling too much poundage.
7. Anchor: Lock into full draw position. Your anchor point (where you position your string hand as you aim) must be easily repeatable. Finger shooters usually put the tip of their index finger to the corner of the mouth. Release shooters place a knuckle in the hollow below their ear, or on the point of the jaw. This may be the most important component of your shot sequence.
8. Aim: As soon as you anchor, you should be looking through the peep. If you have to tilt your head at all, your peep needs adjustment. Centre the sight housing in your peep sight, and place the appropriate sight pin where you want it. You can hold the pin right on your point of aim, or slightly below. (Adjust your sight according to the way you aim.) If the distance to your target is between pins, you can aim high or low, or just hold your point of aim between pins as required. Focusing on your point of aim, rather than the pin, is best.
9. Release: As soon as your target is acquired through the sight, get a finger (or thumb) onto the trigger. As you begin to apply pressure to the trigger, also apply a little pressure to the back wall of the draw cycle. Don’t be content to just sit in the valley. You’ll be much more accurate if you’re actively pulling into the wall, since your cam rotation will be more consistent. Also, don’t worry about holding the sight pin perfectly still, few people can. It’s more important to let it float slightly as you apply pressure to the trigger. Slowly squeeze the trigger and wait for the shot to happen, rather than slapping the trigger as the pin drifts past your aim point. When the shot breaks, it should always be a bit of a surprise.
10. Follow Through: Don’t collapse and drop the bow to your side when the shot breaks. Try to keep the pin on your point of aim until your arrow gets there, then relax. Also, don’t worry about watching your arrow fly or seeing where it hits. These things will result in low-left shots for right-handers.
Leave A Comment