We all have a bit of boat envy. For some, it’s the sight of a sleek bass boat skimming across the water. Others pine for the spacious platform of the latest walleye rig. But, as we tumble back to reality and economics, feasibility, and domestic partnerships prevail, we set aside our yearnings and make do with whatever helps get our lures wet.
Across Ontario, the basic aluminum boat is a mainstay on our lakes. Although sufficient to do its chosen chore, simple refinements and renovations can dramatically transform your plain Jane into the pride of the waterways.
All hands on deck
As hard as it is to believe, my 14-foot Springbok Pro 140 will be celebrating its 24th birthday this season. It doesn’t look a day over 5. And although it’s aged gracefully, due to my meticulous regimen of weekly washes and vigorous vacuuming, the various upgrades I’ve done have kept its condition current and user friendly.
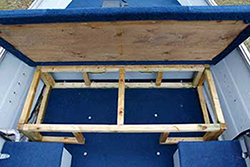
One of the best additions for an aluminum boat is a front casting deck. These elevated platforms allow easier angler movement, increased viewing field, and ease of casting. Building a deck is simple for those with knowledge of basic carpentry. It’s also a relatively inexpensive endeavour.
Decks should be built at least 8 to 12 inches below the lip of the gunnel. This will ensure adequate balance, safety, and stability. Measurements are crucial, and if a front bench seat is available, building your deck on top of this ready-made support is suggested.
Use 2 x 2-inch pressure-treated wood for framework. Once measured and cut (see images to give an idea of a standard layout design), all ends should be dipped in end-cut preservative, for protection against early rotting. Use screws to attach pieces, and if your boat has a wooden floor, fasten the entire assembly to this structure. For those with no wooden floor, extra supports should be added, so the assembly can sit securely but unattached on the metal base.
The new deck is constructed of ¾-inch plywood. Although marine plywood can be used, the less expensive standard variety has lasted 10 years plus on my boat.
Make accurate measurements of the boat where the deck is to be positioned, taking into consideration the sloping construction of the bow. A cardboard template is useful for this step, as a simple mis-measurement with the real deal can be a costly mistake. To look and function its best, the deck should fit snugly against the hull of the boat and any structures it will abut. Allow room for the deck carpet.
Prior to installing the carpet, drill holes throughout the deck to correspond to the top members of the frame. The number of holes is contingent on the size of the deck, but securely fastening it is a priority.
Depending on the layout of your boat, under-deck storage can be created by utilizing the design of your footings. I was also able to incorporate an enclosed storage compartment by adding a hinge system to an already fixed front seat area.
Carpet considerations
Choose a quality marine carpet to finish off your deck project. Those that are UV (ultraviolet), stain, and water-resistant get the nod. A rubber or plastic-backed style will also hold up better to wear, as well as provide waterproofing qualities. Carpet can be purchased from marine or boat-supply stores and is often sold in a standard width, priced by the foot.
Colour is a personal choice. My Springbok came with a carpeted floor, so I chose to colour-match to keep the entire deck and floor uniform in hue.
Allow a 4- to 6-inch overlap when carpeting the deck. Fasten carpet with marine glue and use a staple gun to affix edges on the back. Once complete, use 2-inch coated deck screws to attach deck to frame.
Livewell logistics
For those who crave fresh fish or see a tournament in their future, installing a livewell is a logical step in the boat-renovation game. Three options are available: purchase a livewell kit (which comes standard with container and pump), utilize a sturdy container and buy the kit assembly separately, or have a metal shop weld an aluminum version into which a pump can be easily installed.
I chose the latter. My aluminum well fit inside the outer shell of a storage compartment that came standard on my boat. With a simple aerator pump kit, I was good to go.
While designing your upgrades, figure out where a livewell would work best on your boat. Built into the deck with a hinge system? Inside an existing storage compartment? In front of a seat base? Also, what design works best for your boat? All three styles have their merits and cost points. Ultimately, the layout of your boat and desired well size will be the deciding factor.
Bow-mount benefits
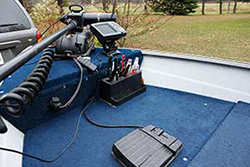
Installing a bow-mount trolling motor is a logical step once your deck is complete. Designed to be controlled by foot or hand, these positioning motors allow an angler complete control of fishing situations – all in a quiet and efficient package. For mounting to occur, a bow-mount platform must be available. Many boats come with this, but if yours doesn’t, attaching a thick plywood base to the top of the bow point can be easily accomplished. Ensure that it’s sturdy, large enough for your style of motor mount, and is physically possible.
The type of foot-controlled bow-mount you choose is dictated by the size of your boat and deck space you have available. Cable-driven models take up far greater space – both in the size of mount and bulkiness of cable/foot pedal. For smaller boats (especially those in the 14-foot range) the more compact power-drive version gets the nod.
Underwater eyes
Electronics have been a mainstay on my boat for more than two decades, but an upgrade this past season opened my eyes to the value of sonar. I installed a Humminbird 597 ci HD on the front and a 798 ci HD, with side and down imaging, at the back. Both offer GPS capabilities. Finding fish, bait, offshore structure, temperature changes – while waypointing all of the above – gave me an indescribable advantage on the water.
My suggestion is to run at least one sonar on your aluminum at the bare minimum. If only one, install the transducer at the stern and position your unit near the driver’s seat. For multiple units, a bow-mount transducer (or stern adaptation kit) can be purchased for utilizing the unit at the front while fishing.
Although electronics can be an expensive investment, they’re a recommended upgrade that immediately pay for themselves. In terms of “souping” up your boat, this rates at the top of the list.
Bilge pumps and panel boxes
A bilge pump is a luxury item on my aluminum that I would be lost without. Knowing that any water that comes on board – either through a downpour, leak, or cresting wave – can be expelled quickly and easily with a simple flick of a switch is reassuring. Kits are inexpensive and installation consists of adhering the pump to the stern floor and hooking it up to your onboard battery.
With myriad electronics on your aluminum, a panel box sporting separate on/off toggles and designated fuses is an upgrade worth considering. My panel box is located behind the driver’s seat and allows me to quickly and easily activate my bilge and livewells. Basic electrical skills are needed for this installation.
Aluminum boats are the standard when it comes to fishing, although they can easily be taken to the next level. Experiment with rigging your craft for the coming seasons and watch your run-of-the-mill boat turn into the envy of the lake.
First published in the 2012 January-February issue of Ontario OUT OF DOORS. Subscribe.


Leave A Comment